Chapter 1 : Introduction to AutoCAD
This lesson describes the working environment and the types of interface elements that you must become familiar with to become proficient in the software.
Before you begin creating drawings, you should familiarize yourself with the interface.

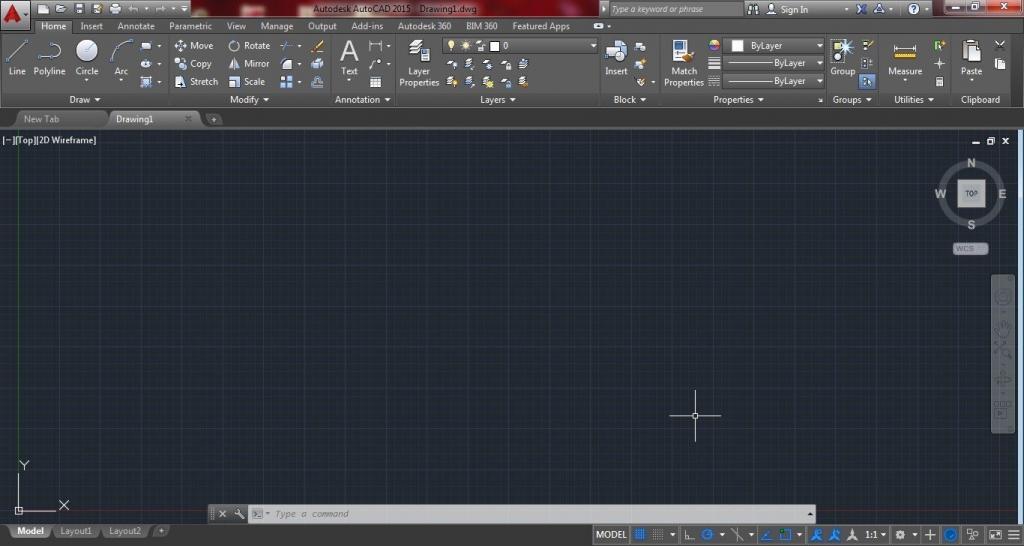
DRAWING AREA
Location: The large area in the center of the screen.
This is where you will draw. This area represents a piece of paper.
The color of this area can be changed using Tools / Option / Display / Color.
CROSSHAIRS / CURSOR
Location: Can be anywhere in the Drawing Area.
The movement of the cursor is controlled by the movement of the pointing device such as a mouse.
You will use the cursor to locate points, make selections and draw objects. The size can be changed using Tools / Options / Display / Crosshair Size.
Application Menu

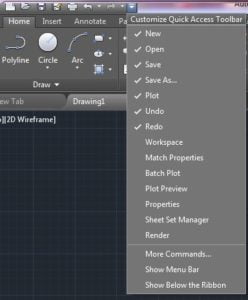
Quick Access Toolbar
- Click on one of the following icons for quick access to commands
QNEW, OPEN, SAVE, PLOT, and UNDO/REDO

To customize quick access Toolbar

Info Center
Quickly search for various information sources, access product updates and announcements, and save topics with InfoCenter.

Ribbon
The ribbon provides a single, compact placement for operations that are relevant to the current workspace. It eliminates the need to display multiple toolbars, reducing clutter in the application window. The ribbon maximizes the area available for work using a single compact interface.
The ribbon can be displayed horizontally, vertically, or as a floating palette. The horizontal ribbon is displayed at the top of the drawing window by default when you create or open a drawing.
You can create your panels to display on the ribbon; you can also modify the existing ribbon panels’ commands and controls.

Status Bar and Command Prompt
The Status Bar is the area below the command line that shows messages and coordinates, modes, and the current time.
To activate SNAP, GRID, ORTHO, OSNAP, Dynamic input, and annotation scale, you must click on the change mode.

Location: Below the Command-Line.
Displays your current settings. These settings can be turned on and off by clicking on the word (Snap, Grid, Ortho, etc.) or by pressing the function keys, F1, F2, etc.
See button descriptions below.
SNAP (F9)
Increment Snap controls the movement of the cursor. If it is off, the cursor will move
Smoothly. If it is ON, the cursor will jump in an incremental movement.
The increment spacing can be changed at any time using Tools / Drafting Settings
/ Snap and Grid. The default spacing is .250.
GRID (F7)
The grid (dots) is merely a visual “drawing aid”. The default spacing is 1 unit.
You may change the grid spacing at any time using: Tools / Drafting Settings /
Snap and Grid.
ORTHO (F8)
When Ortho is ON, cursor movement is restricted to horizontal or vertical. When
Ortho is OFF, the cursor moves freely.
POLAR (F10)
POLAR TRACKING creates “Alignment Paths” at specified angles.
OSNAP (F3)
RUNNING OBJECT SNAP
Specific Object Snaps can be set to stay active until you turn them off.
OTRACK (F11)
OBJECT SNAP TRACKING
Creates “Alignment Paths” at precise positions using object snap locations.
LWT
LINEWEIGHT. Displays the width assigned to each object.
Command prompt
AutoCAD has two types of input command input and graphical input .

SPECIAL KEY FUNCTIONS
Escape Key Cancels the current command, menu, or Dialog Box.
Enter Key Ends a command, or will repeat the previous command if the command line is blank.
Space Bar Same as the Enter Key, except when entering text.
METHODS OF ENTERING COMMANDS
AutoCAD has three different methods of entering commands. All three methods will accomplish the same end result. AutoCAD allows you to use the method you prefer. The following are descriptions of all three methods and an example of how each one would be used to start a command, such as the Line command.
1. Pulldown Menu (page 2-8) (Select Draw / Line)
a. Move the cursor to the Menu Bar
b. Click on a Menu header such as “Draw”
c. Slide the cursor down the list of commands and click to select.
2. Tool Bars (page 2-9) (Select the Line icon from the Draw toolbar)
Move the cursor to an icon on a toolbar and press the left mouse button.
3. Keyboard (Type L and <enter>)
METHODS OF SELECTING OBJECTS
Most AutoCAD commands prompt you to “select objects”. This means, select the objects that you want the command effect.
There are 2 methods.
Method 1. Pick, is very easy and should be used if you have only 1 or 2 objects to select.
Method 2. The window is a little more difficult but once mastered it is extremely helpful and time-saving. Practice the examples shown below
Type the command on the command line.
Method 1. PICK : When the command line prompt reads, “Select Objects”, place the cursor (pick box) on top of the object and click the left mouse button. The selected object will change in appearance. This appearance change is called “dithered”. This gives you a visual notice of which objects have been selected.
Method 2. WINDOW: Crossing and Window
Crossing:
Place your cursor in the area up and to the right of the objects that you wish to select (P1) and press the left mouse button. Then move the cursor down and to the left of the objects (P2) and press the left mouse button again. Only objects that this window crosses or completely encloses will be selected.
In the example on the right, all 3 circles have been selected. (The 2 small circles are completely enclosed and the large circle is crossed by the window.)
Note: Crossing windows are identified by a dashed line appearance.
Window:
Place your cursor in the area up and to the left of the objects that you wish to select
(P1) and press the left mouse button. Then move the cursor down and to the right of
the objects (P2) and press the left mouse button. Only objects
that this window completely encloses will be selected.
In the example on the right, only 2 circles have been selected.
(The large circle is not completely enclosed.) This Window is identified by a continuous (solid) line appearance.
Pointing Device (Mouse)
AutoCAD uses either a mouse or digitizing tablet to select objects in a drawing.
Left Mouse Button
Used to pick or select objects
1. Click the left mouse button to select an object area in the Drawing.
2. Press ESC twice to deselect an object (or to cancel a command).
Right Mouse Button
Used to enter a command, repeat last command, or access shortcut menus.
1. Click the right mouse button.
Undo and Redo
Reverses the last action.
1. Choose Edit, Undo.
or
2. Click
the Undo icon.
or
3. Press CTRL + Z.
4. Type U at the command prompt to undo the last command.
Command: U
Redo
Reverses the effects of a single UNDO or U command.
Choose Edit, Redo.
or
Click the Redo icon.
or
Type REDO at the command prompt to redo the last undo command.
Command: REDO
Units-
Format>> Units
Change units from Decimal to Architectural for working with feet & inches


